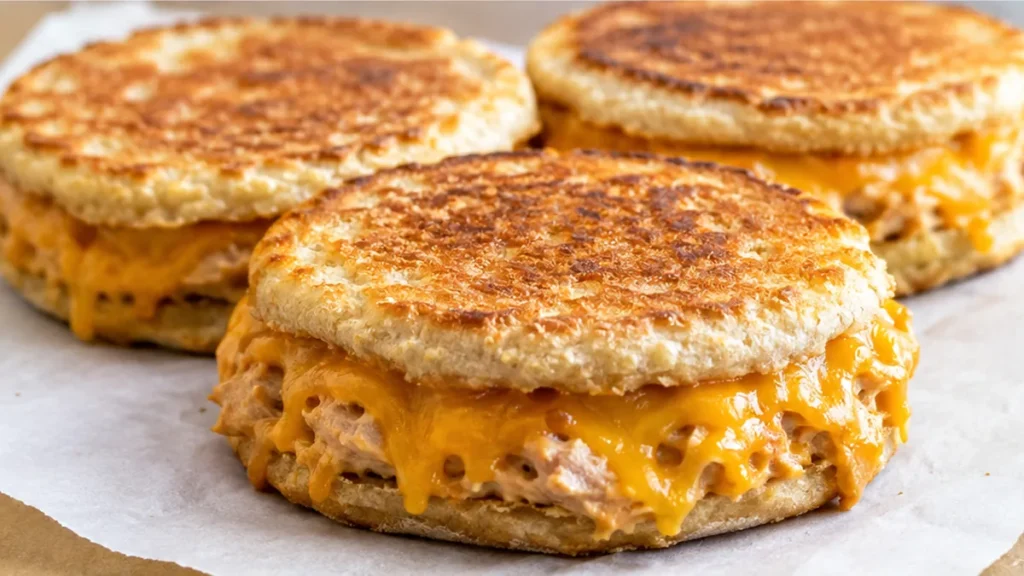
Tuna melts bring together creamy tuna, savory seasonings, and a perfectly toasted base, all topped with bubbly, melted cheese. This recipe for open-faced tuna melts transforms simple ingredients into a satisfying meal that’s both quick to prepare and incredibly comforting. Crafting a delicious tuna melts doesn’t require culinary acrobatics; it’s about good ingredients and smart technique. This version emphasizes a golden, crispy English muffin base and a flavorful tuna mix, ensuring every bite is a combination of textures and tastes, making it an ideal choice for a weeknight dinner or a relaxed weekend lunch.
Key takeaways
- Toasting English muffins prevents sogginess.
- Properly mixing tuna with mayonnaise and seasoning ensures flavor.
- Using grated cheddar cheese enhances meltability and flavor.
- Adjusting cooking time and temperature is key to achieving a crispy top.
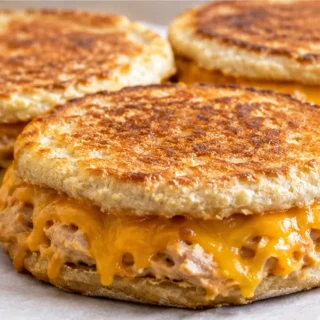
Golden Tuna Melts: Crispy & Cheesy Perfection!
Ingredients
- 3-4 English muffins (cut in half)
- 2 cans tuna (drained)
- 3 tablespoons mayonnaise
- ½ teaspoon curry powder (more or less to taste)
- ¾ cup cheddar cheese (grated)
Instructions
- Place English muffin halves on a broiler pan. If you like a crispy crust, place under the broiler to toast for a few minutes while you mix the tuna.
- In a medium bowl, combine the drained tuna, mayonnaise, and curry powder. Add ½ cup of the grated cheddar cheese. Mix well until everything is evenly combined.
- Spread the tuna mixture generously over each English muffin half.
- Sprinkle the remaining grated cheddar cheese evenly over the tuna mixture on each muffin.
- Place the loaded English muffins under the broiler until the cheese is melted, bubbly, and golden brown, approximately 3-5 minutes. Watch carefully to prevent burning.
- Carefully remove from the broiler and serve immediately while hot and cheesy.
Video
Notes
Understanding the Base: Why English Muffins Matter
English muffins serve as the ideal base for tuna melts due to their unique texture and structure. Their nooks and crannies allow for optimal cheese melt and toppings to adhere. A standard English muffin weighs about 57 grams; when cut in half, it provides a sturdy platform for the tuna mixture. Toasting the muffins before adding toppings enhances crunchiness, creating a delightful contrast with the creamy filling.
Creating the Perfect Tuna Mixture
The tuna mixture is the heart of the tuna melt. Start with two cans of drained tuna, roughly 300 grams total. The addition of 3 tablespoons of mayonnaise not only adds creaminess but also creates an emulsion that binds the ingredients together. The curry powder, at ½ teaspoon, adds depth; adjust according to your preference. Mixing these ingredients thoroughly ensures even distribution of flavors, which is crucial for a balanced bite.
Cheese Selection and Melting Techniques
Using ¾ cup of grated cheddar cheese is essential for achieving that gooey, melty texture characteristic of a great tuna melt. Cheddar has a fat content of around 33%, which aids in browning and flavor development through the Maillard reaction when exposed to heat. To achieve optimal melting, preheat your oven to 375°F (190°C) and bake the assembled melts for about 10-12 minutes. Broiling for the last 2 minutes can enhance browning if desired.
Troubleshooting Common Tuna Melt Issues
- Issue: Soggy English muffins
- Cause: Not toasting the muffins before adding toppings.
- Fix: Always toast the muffins to create a barrier against moisture.
- Issue: Uneven melting of cheese
- Cause: Using cold cheese straight from the fridge.
- Fix: Grate cheese and let it sit at room temperature for about 15 minutes before use.
- Issue: Flavorless filling
- Cause: Insufficient seasoning in the tuna mixture.
- Fix: Taste and adjust seasoning with salt, pepper, or additional curry powder as needed.
Substitutions and Their Impact
- Substitution: Greek yogurt for mayonnaise
- Impact: This swap reduces calories and adds tanginess but may alter the creaminess.
- Substitution: Pepper jack cheese instead of cheddar
- Impact: Adds a spicy kick, but may not melt as smoothly.
- Substitution: Whole wheat muffins instead of English muffins
- Impact: Increases fiber content but alters the texture and flavor profile.
How to Make Tuna Melts Ahead of Time
Preparing tuna melts in advance can save you time during busy weeknights. To make them ahead, prepare the tuna mixture and store it in an airtight container in the refrigerator for up to 3 days. When ready to serve, simply toast the English muffins, assemble the tuna mixture with cheese, and bake until golden. This method retains the freshness of the ingredients while allowing for quick assembly.
Scaling the Recipe for a Crowd
If you plan to serve a larger group, scaling the tuna melts recipe is straightforward. For every additional 2 cans of tuna, increase the mayonnaise and cheese proportionally, maintaining a ratio of 3 tablespoons of mayonnaise for every 2 cans of tuna. This ensures the mixture remains creamy and flavorful. Bake in batches if your oven can’t accommodate all the melts at once, ensuring even cooking and melting.
Choosing the Right Equipment for Perfect Tuna Melts
The choice of equipment can significantly affect the outcome of your tuna melts. A toaster oven is ideal for small batches, providing even heat distribution and a crispy finish. If using a conventional oven, place the melts on a baking sheet lined with parchment paper to prevent sticking. For optimal cheese melting, consider using a broiler for the final few minutes, ensuring a bubbly, golden top without overcooking the base.
How Ingredient Quality Affects Tuna Melts
The quality of your ingredients can greatly influence the final taste of your tuna melts. Fresh, high-quality tuna will yield a better flavor than canned varieties, while artisanal English muffins provide a superior texture. Seasonal ingredients, such as fresh herbs or vegetables like tomatoes, can elevate the dish. Aim for ingredients that are at their peak quality to ensure the best results, as this dish is simple and relies heavily on the flavors of each component.
How to Store and Reheat Leftover Tuna Melts
Proper storage is crucial for maintaining the quality of your tuna melts. After cooking, allow them to cool to room temperature before storing. Place the melts in an airtight container and refrigerate for up to 2 days. When reheating, use an oven preheated to 350°F (175°C) for about 10-15 minutes to ensure the bread remains crispy and the cheese melts evenly. Avoid microwaving, as it can make the bread soggy.
Scaling the Recipe for Larger Gatherings
When scaling up your tuna melts for a crowd, it’s important to maintain the ingredient ratios to ensure consistent flavor and texture. For every additional can of tuna, increase the mayonnaise, curry powder, and cheese proportionally. For instance, if doubling the recipe, use 4 cans of tuna, 6 tablespoons of mayonnaise, 1 teaspoon of curry powder, and 1.5 cups of cheese. Prepare them in batches to avoid overcrowding the cooking surface, which can lead to uneven cooking.
Equipment Variations and Their Impact on Cooking Tuna Melts
The choice of equipment can significantly affect the outcome of your tuna melts. Using a broiler can create a beautifully browned top, while a toaster oven provides more even heat distribution. If using a skillet, ensure it’s preheated to medium heat to achieve a golden crust without burning. Each method has its nuances; for instance, a broiler may require closer monitoring to prevent over-browning.
How Seasonal Ingredients Influence Tuna Melt Flavor
Seasonal ingredients can elevate your tuna melts in unexpected ways. In summer, consider adding fresh herbs like basil or dill, which can enhance the flavor profile. In fall, a touch of roasted garlic or caramelized onions can add depth. The quality and freshness of your ingredients, especially the tuna and cheese, can drastically change the taste. Freshly caught tuna will have a more pronounced flavor compared to canned, while artisanal cheeses can add complexity to the dish.
How to Prepare Tuna Melts in Advance Without Sacrificing Quality
Preparing tuna melts ahead of time can be a real time-saver, especially for busy weeknights or gatherings. To do this effectively, prepare the tuna mixture by combining drained tuna, mayonnaise, and curry powder in a bowl. Store this mixture in an airtight container in the refrigerator for up to 2 days. When ready to serve, simply toast the English muffins, top them with the chilled tuna mixture, and sprinkle with cheese before broiling. This method ensures that your tuna melts are fresh, flavorful, and maintain the desired texture. The key to success is ensuring that the English muffins are toasted just before serving to achieve that crispy base, which contrasts beautifully with the creamy tuna filling.
Understanding the Impact of Ingredient Quality on Tuna Melts
The quality of the ingredients used in tuna melts can significantly affect the final outcome of the dish. For instance, using high-quality canned tuna packed in oil rather than water can enhance the richness and flavor of the tuna mixture. Additionally, freshly grated cheddar cheese melts better than pre-packaged shredded cheese, which often contains anti-caking agents that can affect melting properties. Fresh English muffins, preferably from a bakery, will provide a superior texture and flavor compared to store-bought varieties. When using seasonal ingredients, such as fresh herbs or locally sourced produce, you can elevate the flavor profile of your tuna melts, creating a unique twist that sets your dish apart from traditional recipes.
How to Make Tuna Melts Ahead of Time Without Sacrificing Quality
Preparing tuna melts in advance can be a time-saver, but care must be taken to preserve their texture and flavor. To do this, prepare the tuna mixture by combining drained tuna, mayonnaise, and curry powder, then store it in an airtight container in the refrigerator for up to 24 hours. When ready to serve, toast the English muffins lightly before assembling the melts. This prevents them from becoming soggy when the tuna mixture is added. Top with cheese and broil until melted and bubbly. This method ensures that the muffins remain crisp while the filling stays flavorful.
Understanding the Impact of Scaling the Recipe for Larger Gatherings
When scaling tuna melts for a larger crowd, maintaining the balance of flavors and textures is crucial. For every additional can of tuna, increase the mayonnaise and cheese proportionately to maintain the desired creaminess and cheesiness. A good rule of thumb is to use 1 tablespoon of mayonnaise for every can of tuna. Additionally, ensure that the English muffins are evenly toasted to prevent sogginess. If making more than 8 servings, consider using a baking sheet to broil multiple tuna melts at once. Keep an eye on the cooking time, as larger batches may require slightly longer under the broiler. This approach allows you to serve a consistent product without compromising quality.
Pro tips
- For extra crunch, toast the English muffins slightly longer before adding the tuna mixture. This helps prevent them from becoming soggy.
- If you don’t have a broiler, you can bake the tuna melts in an oven at 375°F (190°C) for 8-10 minutes, or until the cheese is melted and bubbly. – Make-ahead tip: Prepare the tuna mixture up to 24 hours in advance and store it in an airtight container in the refrigerator. Assemble and broil just before serving. – For food safety, ensure any prepared tuna mixture is refrigerated promptly and consumed within 3-4 days.
This open-faced tuna melt recipe is a testament to how simple ingredients can create deeply satisfying meals. Experiment with different cheese varieties or a pinch of paprika for a smoky twist. Enjoy this easy and delicious classic!
Frequently asked questions
Can I use canned tuna in oil instead of water?
Yes, using canned tuna in oil can add extra flavor and richness to your tuna melts. However, be sure to drain it well to avoid excess oil making the mixture too greasy.
How do I prevent my tuna melts from getting soggy?
To prevent sogginess, always toast your English muffins before adding the tuna mixture. This creates a barrier that helps maintain their crispness during baking.
Can I make these tuna melts ahead of time?
Yes, you can prepare the tuna mixture and store it in the refrigerator for up to two days. Assemble the melts just before cooking for the best texture and flavor.
What if I don’t have curry powder?
If you don’t have curry powder, you can substitute with paprika or a blend of cumin and coriander for a different flavor profile. Adjust the quantity according to your taste preferences.
More from Keto Snacks & Fat Bombs →